This was originally posted on Reddit by BinaryDichotomy
Many of us have AT&T Fiber internet service (aka Gigabit internet), and as such have the Arris BGW210-700 Gateway (herein further referred to as Arris). I see a lot of posts stating how difficult it is to put into so-called “bridge” mode so we can set up our Unifi Security Gateways (USG) to get an addressable WAN port on it, mainly so we don’t have to be double NATted, or set up two sets of port forwarding rules, or have to maintain two devices. This actually turns out to be very easy to do, but the reason we all feel it’s so difficult is because the documentation to do so is non-existent. In this post I’ll outline how to do this. This should work with any type of router, but this is a Unifi forum so of course I’ll focus on this equipment. (If you’re using a different router, swap out “USG” below for your router while reading)
There are actually two scenarios that the Arris supports, each with its owns pros and cons (that I’ll touch on but won’t take a deep dive into). The Arris supports two types of “bridge” mode:
- Default Server: This configuration is like telling the Arris to put an internal device into a sort of DMZ, where your Arris keeps its own public IP address on its WAN port, and your internal device (in our case, a USG) gets an IP address on a specified DMZ subnet for its WAN port address (I’ll explain what this means exactly in a bit).
- IP Passthrough: This configuration is the closest to actual bridge mode as the Arris will pass through its WAN IP address (your public IP address) to the USG’s WAN port.
Unless you absolutely have to use Default Server for whatever reason, you’ll want to do IP Passthrough, the main reason being that Default Server will double NAT you, which can lead to problems. It’ll also cut down on administrative overhead. But if you need to layer other security devices between your Arris gateway and your USG, this is the option you’ll need.
The key to making this all happen is fairly simple to do: In order for either of the above to work, you must set your Arris’s LAN port address to a subnet that doesn’t overlap with any of your internal subnets (this includes VLANs). Let’s say you have a single network for your LAN, which is 192.168.1.0/24 (which creates a usable subnet of 192.168.1.1-254). Out of the box, the Arris also uses this subnet, so before you attempt to use either Default Server or IP Passthrough, you have to change the Arris’s LAN address to something outside of that subnet. In my case, I used 192.168.48.1, which doesn’t overlap with 192.168.1.0/24 at all. If you’ll be using a very wide 192.168.. subnet, you can use any of the private IP address ranges, it just A) has to be private and B) must not overlap with any of your internal subnets.
Here’s an image of how I have mine set up, and note that I also have DHCP turned on with an extremely narrow address scope. This page is located on the Home Network tab, in the Subnets & DHCP section of the Arris admin web UI.
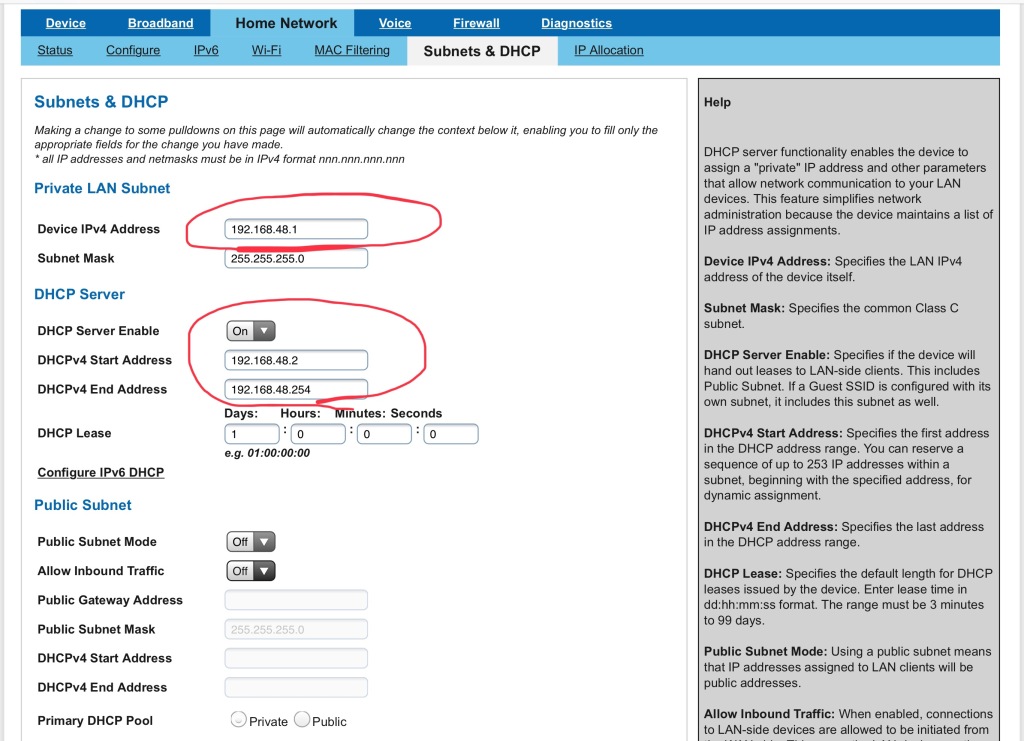
Arris Subnets and DHCP Configuration
Also, unless you’ve been given a range of IP addresses by your ISP, leave the rest of the choices off. The DHCP Server option can be turned off if you’re doing IP Passthrough, but you must leave it on if you are doing Default Server, because your Arris gateway is going to be what assigns an IP address to the WAN port of your USG, so there has to be a pool from which to choose.
After you’ve configured this, you can navigate to the Firewall tab, and in the IP Passthrough section, you’ll see a screen like the following:
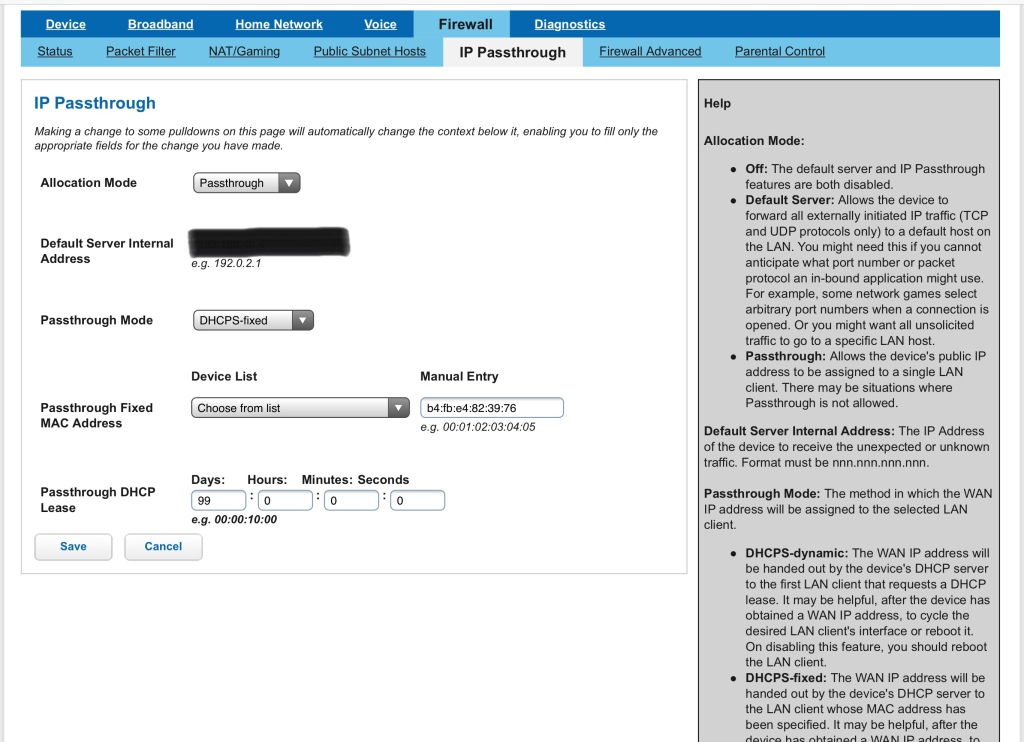
Arris Firewall IP Passthrough Configuration
The allocation mode dropdown has two choices:
- Default Server: The option to choose which server gets all traffic that passes through the Arris, again this like putting the server onto the DMZ…I’m trying to keep this explanation simple, but really what you’re telling the Arris to do is forward all traffic to whatever device you specify).
- IP Passthrough: The option to choose that will allow the device you specify to bind to your external IP address, which effectively removes the Arris device from your topology (though you have to keep it since it does the security handshake with your ISP, you cannot physically remove the Arris device from your network).
The passthrough mode dropdown has three options, all three of which are well documented in the grey sidebar, so I won’t go over the options here. DHCPS-fixed seems to work best as it allows you to specify the MAC address of the device to pass traffic through to. It is worth mentioning that this is still a DHCP address that your internal device is getting, so I like to specify an inordinately long address lease duration. It’s also worth mentioning that either choice will still allow your Arris device to be addressable since your USG is now able to route traffic, so you can navigate to 192.168.48.1 and get the Arris admin page (though I like to keep a 2.4ghz SSID on on the Arris, and give it very little power, that way if something happens you can still log on to that SSID and administer the device).
The configuration needed on your USG is minimal since it’s already configured to obtain DHCP leases on the WAN port out of the box++. If you have problems with it obtaining a DHCP lease, you can configure the USG to obtain a static IP address, just make sure you copy in the IP configuration from your Arris device, which can be obtained from the Home network status page. I’ve never not had a USG be able to obtain the correct address via DHCP though, though there could be requirements where you must specify static IP address info for your USG’s WAN port.
Once you’ve configured your Arris properly, reboot your USG (or other branded device) and its WAN port should obtain either an IP address on your Arris’s internal LAN subnet (in the case of Default Server configuration), or your external IP address (in the case of IP Passthrough). If done correctly, your status page for your Arris’s Home Network should look like the following:
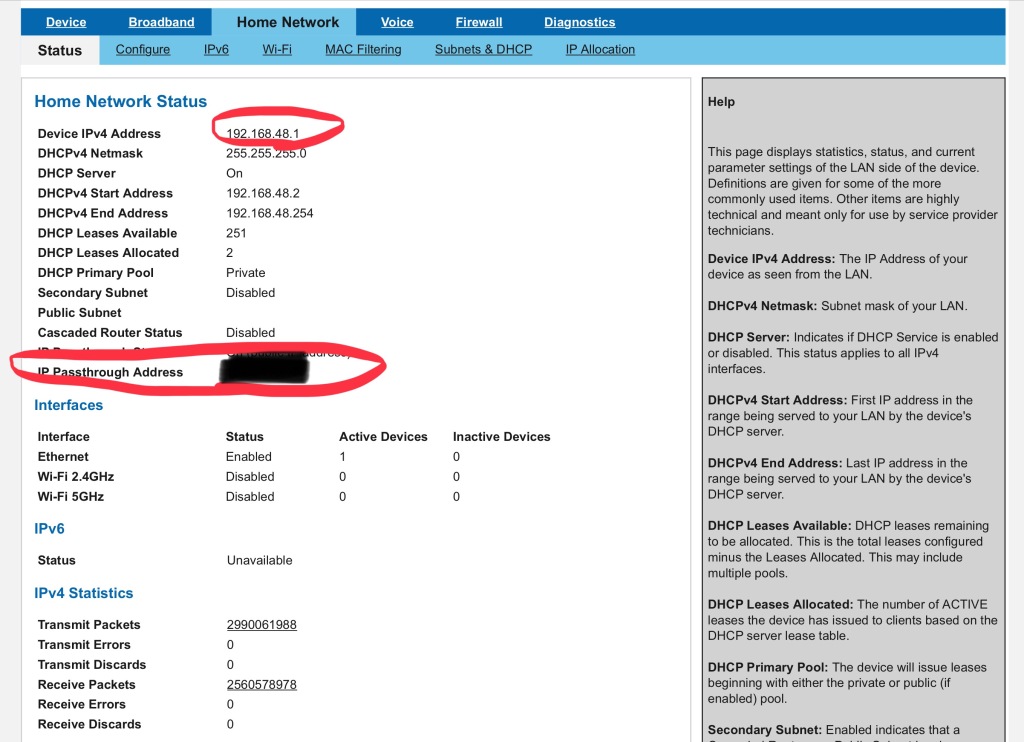
Arris Home Network Status Page
If this doesn’t work, double check your settings to make sure you have the correct internal device selected on the Firewall -> IP Passthrough page. If the values have reset back to defaults, it means your subnet configuration is wrong on your Arris device.
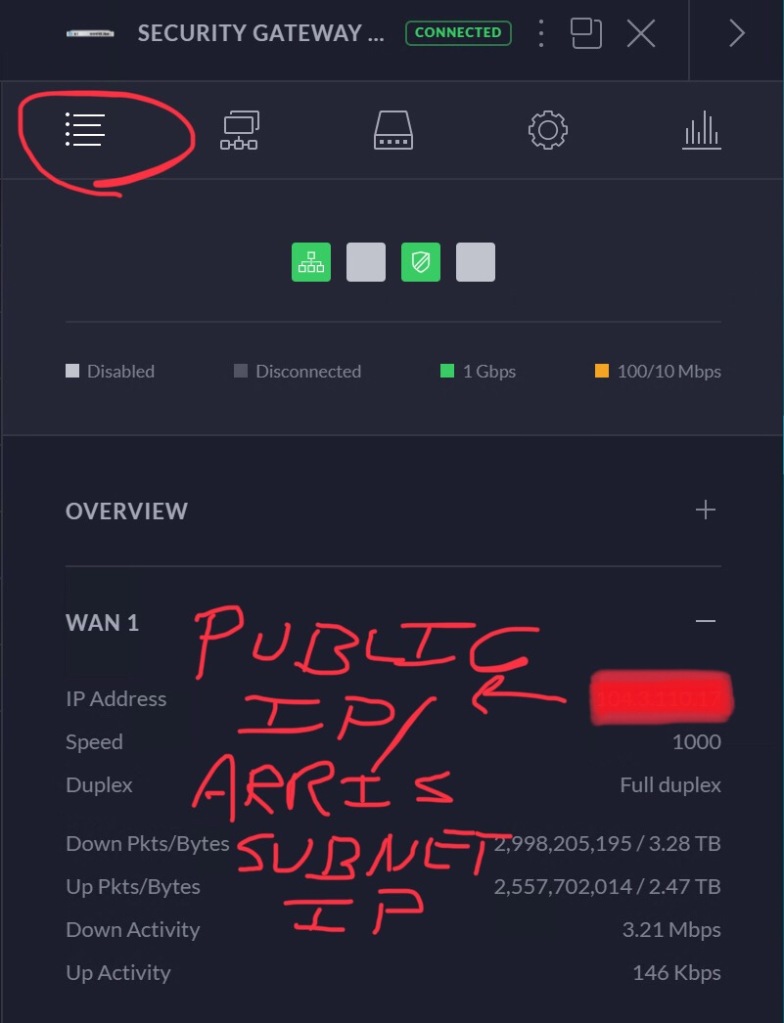
This is what you should see in Controller if your USG has properly obtained a “passthrough” address.
++ Prior to adoption, your USG is available on your network at 192.168.1.1, so make sure your Arris device is configured BEFORE you plug in your USG — the defaults for the Arris are also 192.168.1.1, so it might not be navigable if you don’t configure your Arris beforehand. This is also where you can specify for your USG to obtain either a static address or DHCP address.
Here’s what the configuration page for the USG Pro 4 looks like, and please note that this configuration page is only meant for USG configuration pre-adoption. Once it’s adopted, this configuration will be overwritten by values configured in Controller.

Appendix: I like to create extra DNS records to make getting to various configuration pages simpler, and this is the pattern I follow:
- Arris.<yourdomain>.com: A or CNAME record to the LAN IP address we configured earlier, in this case 192.168.48.1 (this will be routable if your configuration succeeds)
- USG.<yourdomain>.com: A or CNAME to LAN IP of the USG device
- USG-LAN.<yourdomain>.com: Same as above
- USG-WAN.<yourdomain>.com: A or CNAME to the WAN IP address, either your external IP address if configured as IP Passthrough, or the DHCP address on the 192.168.48.0 subnet assigned to the WAN port of your USG
All of the above will be routable and addressable, and this keeps things easier if you need to do further configuration without having to keep a laundry list of IP addresses laying around.

You must be logged in to post a comment.